
To begin working with jobs, open the Jobs Interface.
The work list shows all the available jobs. Above the list, there is a button for creating new jobs, a filter by resource where the jobs are stored, and a search.
Job information
To the left of the job name, you can see an icon denoting the job type. The list also displays other icons which show the following information:
| Icon | Description |
|---|---|
|
|
The job is enabled. |
|
|
The job is disabled. |
|
|
The number of executions. |
|
|
The allowed number of executions specified in the job properties. |
The job tooltip contains the following information:
- job type;
- parameters related to the specified settings;
- schedule according to which the job is carried out;
- date and time of the last execution;
- resource in which the job is stored;
- description (if specified).
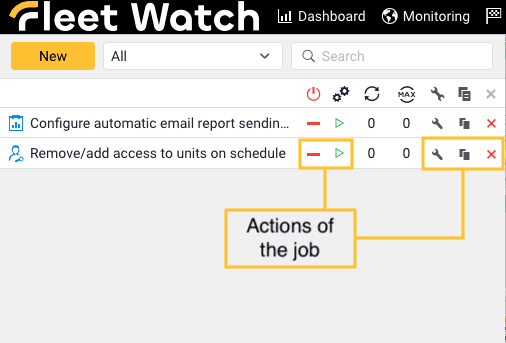
Actions with jobs
The following actions with jobs are available from the work list:
| Icon | Description |
|---|---|
|
|
Disable the job (the icon changes to |
|
|
Enable the job (the icon changes to |
|
|
Start a test execution of the job. In this mode, the job is executed once within a minute irrespective of the specified schedule. During the execution the icon becomes inactive. The information about the test job execution is displayed in the log and in the Log table in a report on the user. |
|
|
View or change the job settings depending on the access rights: only the View jobs right or combined with the Create, edit, and delete jobs right, respectively. The available settings depend on the job type and are described on the corresponding pages. |
|
|
Copy the job, that is, create a new job using the selected one as a template. A click on the icon opens the job creation window in which the same settings are selected as in the original job. |
|
|
Delete the job. |
